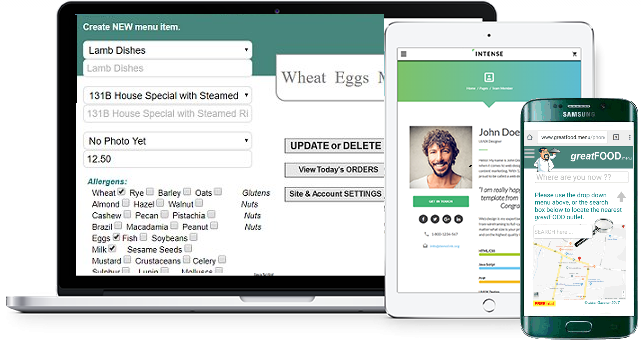
 CONTROL PANEL: CONTROL PANEL:
After you have CREATED your online ordering portal
you may edit and manipulate anything and everything.
A default Menu is initially created.
However, we will customise this according to your instructions -
FREE.
When you LOG in to your Control Panel you will be presented with the
options on the right.
The most important are:
1. QR Codes.
2. Current ORDERS. Control
Panel LIVE Demo |
|
| |
 CONTROL PANEL: CONTROL PANEL:QR Codes:
These are automatically generated, and you may choose from the drop
down menu to immediately create a QR Code for your customer:
1. Table QRs.
2. Room QRs.
3. External QRs
After you have chosen a QR, you may either PRINT it (directly from
your phone if you have a wireless printer), or you can present it to
your customer who can scan it with their phone.
Your MENU IMMEDIATELY appears on their phone.
No App download required. If you ONLY do takeaway you may
not need QR Codes.
However, you might like to print a QR Code for "EXTERNAL"
customers - to place in a prominent position in your premises - the window
perhaps.
You can also print QR Codes onto Sticky Labels using the Android Printer. These labels can be stuck to any pre-printed menus you already have.
QR
Code LIVE Demo |
|
| |
CONTROL PANEL: Current
ORDERS: Here you can view and respond to ALL Orders. Using the  and the
  buttons you may instantly swap between QRs & Orders.
This is useful if you wish to welcome your customers and monitor orders
at the same time.
You can see exactly WHERE your customer is ORDERing FROM:
which Table - which Room - or Outside
You may also choose to REFUSE any order by clicking the "TOO
LATE" button.
(or set a lastorders time - see - "Settings -
Lastorders" below).
Current
Orders LIVE Demo |
|
| |
|
|
| |
|
|
| |
|
 CONTROL PANEL: CONTROL PANEL:
SETTINGS: MENU Timing: Set your Menu TIMES....
For most users this can be ignored.
If you have set meal times and would like the option to automatically HIDE
menus outside the time you actually serve these meals then this will do
the job for you.
As you set the times you can immediately see how it will all look on the
first page.
When you are happy with the layout click UPDATE.
Menu
Timing LIVE Demo
|
|
| |
|
|
| |
|
 CONTROL PANEL: CONTROL PANEL:
SETTINGS: menu
THEME: Change the colour scheme and layout in 3 seconds ! Menu
Theme LIVE Demo
|
|
| |
|
 CONTROL PANEL CONTROL PANEL
SETTINGS: opening
HOURS: Display your OPENING Hours...
When closed your OPENING / CLOSING Hours will be displayed.
You may also set a time for "Last Orders" - All order
attempts will be blocked after this time. Opening
Hours LIVE Demo
|
|
| |
|
|
| |
|
|
| |
|
 CONTROL PANEL CONTROL PANEL
SETTINGS: Android RECEIPT
printer: If you have invested in one of our Thermal Printers you can turn it ON or OFF here.
When your thermal printer is ON it will simultaneously receive all internet and/or table (and/or Room) orders, and automatically print a receipt.
In fact, you may choose to use this on it's own.
It is also a Dual-Sim Phone
You can present QR Codes to your customers with it. Simply bring up the QR Code for the table you are directing the customer to. The customer scans it with their phone and immediatrely they have your menu - associated with the table they are seated at.
You can print QR Codes onto Sticky Labels using the Android Printer. These labels can be stuck to any pre-printed menus you already have.
It has a camera .... Not only can you do everything with it - you can do more .... Thermal
Printer LIVE Demo
|
|
| |
|
 CONTROL PANEL CONTROL PANEL
SETTINGS: MENUS add or remove: Temporariily
ADD or REMOVE entire menus with a single click. MENUS
Change LIVE Demo
|
|
| |
|
 CONTROL PANEL CONTROL PANEL
SETTINGS: CONTACT tracing: During the Covid-19 Crisis this is set at YES by default.
If Contact Tracing is not obligatory in your country you can set this to NO - then, when your customers order at a table they will only be asked for their name.
Customers ordering from home for Delivery or Takeaway will still be asked for their phone number. CONTACT
Tracing LIVE Demo
|
|
| |
|
 CONTROL PANEL CONTROL PANEL
SETTINGS: SPECIAL offers: Any
"Special Offer" and/or Discount you define here will be visible
on your front page. Special
Offers LIVE Demo
|
|
| |
|
 CONTROL PANEL CONTROL PANEL
SETTINGS: UPDATE / DELETE / CREATE: Here
you can see and EDIT ALL your menu items:
All items you tick the "REMOVE" box will be permanently
removed.
All items you tick the "TEMP" box will be temporarily
removed.
(They will be shaded and may be reinstated at any stage by unticking the
"TEMP" box.)
 Click
on the price to EDIT it. Click
on the price to EDIT it.
When you have made your choices click the "UPDATE" button. Click
the actual menu item description to EDIT it.
There you can also add and/or remove allergen, calorie & sugar
information.
You may also use this as a template to create a new menu item
UPDATE LIVE Demo
|
|
| |
|
 CONTROL PANEL CONTROL PANEL
SETTINGS: CREATE menu item: Use
this (or the UPDATE / DELETE / CREATE option above) to add a new
menu item. CREATE
item LIVE Demo
|
|
| |
|
 CONTROL PANEL CONTROL PANEL
SETTINGS: OPTIONAL / MANDATORY menu choices: You may include up to 40 additional options here.
(20 "Optional" options and/or 20 "Mandatory" Choices).
First choose a "MENU item".
Now any options already available for your choice will be visible.
You may ADD options - type an option, followed by choosing the "Type" and the "Cost"
(This will be the additional amount to be added to the cost of the Menu Item).
Then click "ADD".
Repeat the process to ADD more choices.
You may REMOVE any option by clicking the Trash icon to it's left.
"Mandatory" choices are options such as "Rice", "Potatoes", Noodles - The customer MUST choose ONE.
"Optional" choices are useful to promote added value - The customer MAY decide to choose ONE or MORE.
(Optional choices may include items such as "Extra Mushrooms", "Side Salad", "Can of Coke" - essentially anything you think the customer might like with their meal.) Sub MENU choices
|
|




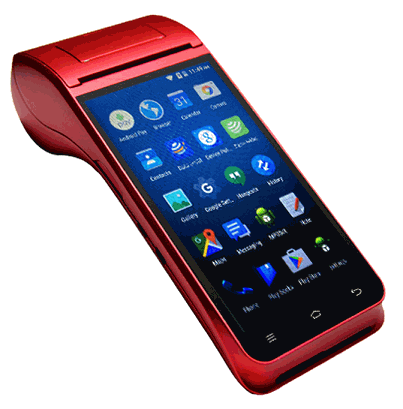 You can view your orders on any internet enabled device - Phone, Tablet, PC ... or you can use our Thermal printer (This automatically retrieves and prints all orders without requiring any other device - and it is a Dual-Sim Phone).